Largemouth bass, an often overlooked quarry on the fly, can be as picky as overfed tabby cats on hot summer days. Targeting heavy cover with poppers, however, can make for explosive eats through weed beds, dock edges, and other aquatic vegetation. The challenge of coaxing a lunker out of frog water is a fast favorite with my clients. When the trout water gets warm in the summer, I make haste to the bass pond to throw top-water poppers for Larries who relish life in the heat and humidity.
Targeting these ambush predators means fishing in and around weeds, logs, and other obstructions. The weed guard is a part of the foundation of a largemouth bass fly, making it possible for the angler to present the fly super tight to cover and fish it without immediately picking up the salad. It takes a little time to get the technique down to tie them in; however, the results justify the means. While some folks refer to them as “fish deflectors,” I assure you that cleaning pounds of bass off your hook is way better than cleaning pounds of weeds.
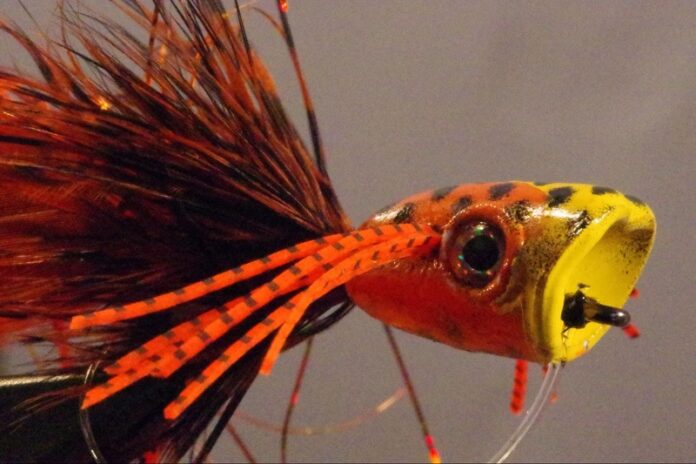
The popper heads can be tied directly out of the package, and that is the quickest path to the finished fly. If you would like to and add some grease to these, the poppers will take spray paint pretty easily. A single coat of primer allowed to fully dry is a must. I follow that by two coats of spray paint to get my base color. Once that is done, you can tape off sections with painters tape and make bigger shapes, about ⅓-1/2 the popper head. I will then add texture to the fly by using the “Pattern Coloring Patches” (Item # PCP from Hareline), and spraying over them with black. I use a lot of yellow, orange, black, and purple. I encourage you to change them to whatever color works best for your home waters.
Having the right fly to draw these aggressive eats is critical. I will walk you through one of my ‘guide-fly’ poppers. Read along after the fly instructions for how to fish this fly productively.
Material List
Hook: B10s or Equivalent heavy gauge straight eye hook
Thread: Black 140 denier
Weed guard: 30 pound monofilament.
Glue: Loctight ultra gel control
Tail feathers: Whiting bugger pack or Montana Fly Company strung saddle hackle
Tail Legs: Montana Fly Company centipede legs
Tail flash: Flashabou
Abdomen: Whiting Schlappen, or Montana Fly Company Schlappen
Popper body: Flymen Group Surface Seducer popper
Special Tools
Wire Cutters for mono
Zuddley Leg puller Hareline item# ZLP, or big embroidery needle
Step 1
Lay your thread onto the shank above the hook point. Lay an even bed of thread down ⅓ the bend and wrap your thread back to the starting point.

Step 2
Cut two 4-5” lengths of thirty pound monofilament. Align the butts of the mono to the very edge of the start of the tread base, this mono will be your weed guard. Next, affix the mono butts with even thread wraps. Keep the mono side by side along the top of the hook, with the excess hanging off of the back of the hook. Add a drop of super glue on the bend of the hook to lock in the weed guard. Wrap down the bend to the bottom of the thread base. Maintain the placement of the mono while wrapping. Then, return your thread to the starting point with even and tight thread wraps. It is critical to leave enough room for the popper head, so be careful not to spill over into the head zone with thread wraps.

Step 3
Select 8 tail feathers from the hide or string. Stack the feathers so that they are aligned by the tip. Securely grab the feather stack maintaining the feathers position and measure two hook shank lengths and cut the entire stack. Now, split the stack into two even piles, Keep these at the ready.

Step 4
Take your popper head and hold it on top of the hook shank, use this to measure how much shank space the popper head takes up. The popper head needs at least a half of a hook eye of space, between it and the eye of the hook. Notice how much space you have between the back of the popper body and the butts of the weed guard. Wrap the thread forward to the point where the back of the popper head ends. Next, Take one stack of feathers and line up the butts of the feathers with the butts of the weed guard. Secure with some light to medium thread wraps. Set the orientation on the side of the hook, and set them with several tighter thread wraps. Do the same on the opposite side. Feel free to add a drop of superglue to the thread wraps. This will help lock the feathers in, and add some indestructibility to the fly.

Step 5
Take the centipede legs and cut the band that holds the legs together. Select two legs and fold them at their center around the thread. Hold the legs with your non-bobbin hand and align them to the side of the hook, while wrapping the thread with the other hand. Take several wraps to secure the legs. Repeat for the opposite side.

Step 6
Cut several strands of Flashabou free from the hank. Fold these around the thread at their center and hold them with your non-bobbin hand. Orient the strands along the top of the hook, while wrapping the thread. Try to span the gap between sets of legs with the Flashabou.

Step 7
Select two Schlappen feathers from the clump and align them by the tips. Next, tie the feathers in by the tips, but don’t spill over the thread base. Wrap both feathers forward at the same time. Stroking the up and back after each wrap. Take some time here to make sure you are not trapping fibers.

Step 8
Take the popper head and skewer it with your bodkin, from the back to front. Keep your bodkin parallel to the bottom of the head, to make sure the popper will sit on the hook in the correct orientation. Dry fit the head on the bare hook shank.
Step 9
Pierce the head behind the eye sockets with your leg puller. Take three legs from your pack and thread them through the leg puller. Try to keep the legs even. Gently pull the legs through the head, with the tool. Grab the legs once you can hold them and then pull them through with your fingers. Stop once the legs are about even on each side. Next, take your scissors and cut the leg puller tool free. Try to trim the legs in the center of the loop. Legs can now be adjusted with your fingers if needed.

Step 10
Make a thread base on the bare hook shank. Whip finish and cut your thread. Add a bead of superglue to the hook shank. Take the popper head and push it in place on the hook shank. Rock the head side to side to make sure the glue is well distributed. The final placement of the head should be about 0.5-1 hook eye gap back from the eye of the hook. Set aside and let dry.

Step 11
Once your glue is dry, re-attach your thread behind the hook eye. Bring the mono closest to you and lightly affix it to the side of the hook behind the eye of the hook. Adjust the mono so that there is 25-30% of the hook gap, hanging below the hook point. While holding the mono tag draw the thread down tight. Repeat for the other side. Cut the mono butts long. Finally, Whip-finish the thread behind the mono and then in front of the mono. Trim the mono butts short and superglue the thread wraps and mono butts.

Step 12
Turn the fly sideways, and add a small drop of super glue to the middle of the eye socket. Take a single eye from the sheet and place it in the eye socket. Lightly direct into place with your bodkin. Repeat for the other side.

How to fish it:
For my local waters, I have found that 30 pound mono makes a good weed guard. I have tried 20 pound and that was not heavy enough to effectively defer the collection of salad, and 40 pound was heavy enough to deflect some fish. Flies should be tied for your local conditions and there are no right answers when it comes to the correct poundage of your weed guards. So, experiment until you find what works for you. Keep your tippets heavy and your strip-set strong and the heaviness of your weed guard will not matter when it comes to hooking and landing large Larrys.
The sweet spot in terms of action is a suitable pop combined with breathable materials, which gives movement on the pause. I give poppers and divers lots of pause during the retrieve, which means they need to look alive in the water. I tie in the tail feathers so they curve away from the fly and place the centipede legs along the side of the fly. The feathers give a little kick on the pause and can help activate the rubber legs. I put the flash on top so it attracts interest but doesn’t overpower the fly. The Schlappen abdomen has a greasy look when wet and can trap bubbles adding to the pause appeal. Finally, the legs through the popper head can maintain a slight vibration into the pause and make the fly quake one way or another. All of these materials together make a stellar subsurface profile. Fish these with a non-slip loop knot to let this fly torque sideways and you will not be disappointed.
When the bass season is in full-swing I am on the water five plus days a week. I need something that I can tie fast, fishes well, and the technique can be described easily. This is where the pre-formed foam popper heads shine; weed guard, tail, abdomen, popper head, repeat. Without painting them you are looking at under 10 minutes a fly. These flies are pretty easy to cast with a 9’ 0x leader. Which makes them easy to rig and my clients tend to cast these farther and more accurately, than deer hair poppers and divers. The retrieve requires the leader and line to be as straight as possible, so a good cast is really helpful. The retrieve is some combination of SPLAT-pause-pause-pause-POP-pause-pause-pause-POP-POP, and usually ends with me saying “set!” #SPLATPOPGULP


